Tray Chic


  I love trays and you can never have enough of them! I use trays for entertaining, on my bath counter, on my bedside table or even at my desk to eat a salad for lunch. Having a beautiful tray adds elegance to any space and this one inspired by a European Rococo style also would make a great gift.

What you need:

  • Krylon Indoor/Outdoor Primer - White (#51315)
  • Krylon Indoor/Outdoor Paint - Blue Ocean Breeze (#51512)
  • Krylon Indoor/Outdoor Paint - Gold (#51510)
  • Krylon Leafing Pens - 18 KT. Gold (#9901)
  • Unfinished wooden tray
  • Scroll stencils
  • Permanent black marker
  • Leftover newspaper/re-cycled paper
  • Scissors
  • Pencil
  • Painters blue tape

Tips

If you can find a "memory tray" which comes with a plexi glass top that goes over the flat surface this is perfect as the clear top will look great over your design and creates a glossy, glass-like effect and protects your design. I would practice on a piece of paper to get the idea before you start your tray. You can easily stencil and try and create shadows on paper first. The key when creating a shadow is to not outline the entire design but rather just along the bottom parts. You can create this tray using the same procedure but changing out the blue color to be anything that aligns with your décor. If you are really artistic you can free hand a design, person's name, a touching sentiment or saying or even an illustration. The stencils simplify the design process but it still looks like you are an artist.

How and How Long:

  1. Spray entire wooden tray with white primer. This will give a good base and even out any imperfections in the wood so that the rest of the colors will be more true to color. Also it keeps the wood from absorbing all the color.
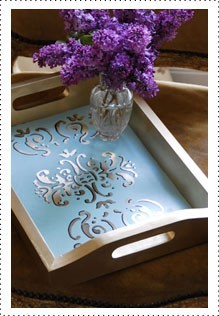
  2. Spray entire base/flat part of the tray lightly, with Blue Ocean Breeze. Keep layers thin and let dry thoroughly. Then re-spray lightly, letting it dry in between coats. Continue this process until you feel you have an evenly coated base. Note: Since you are spraying a flat surface, you have to spray lightly and keep the can moving as you don't want to spray too much in one spot. Let dry completely.
  3. Before spraying the sides of the tray, cover the base by cutting a piece of newspaper, recycled paper or construction paper the size of the base of the tray. Tape off the four edges with blue tape so that it is flush with each side. You are trying to create a clean line between the blue and the gold you will be spraying on the sides.
  4. Spray the entire rim of the tray, inside and out, with Krylon Metallic Finish #1510 Gold. Let dry completely.
  5. Use the scroll stencil and lightly trace out the design with a pencil. Remove the stencil and fill in with Krylon 18kt. Gold Leafing Pen, which will create the design on the flat part of the tray.
  6. To add more dimension to the gold, you can create a shadow by tracing a thin line, along the bottom edge of each shape using a black permanent marker.
Approximate project time: 1 hour.

What it Costs:

Approximate cost is $24.